
Getting started with jsPsychSheet: Running jsPsych experiments on Google Apps Script using jsPsychSheet
Getting started with jsPsychSheet: Running jsPsych experiments on Google Apps Script using jsPsychSheet
Three basic steps are needed to run a jsPsych experiment on Google Apps Script:
Fork jsPsychSheet repo to your own github account and design your experiment inside the experiment folder.
Modify your jsPsych experiment to use jsPsychSheet
Host your experiment on Google Apps Script
Step 1: Fork jsPsychSheet repo to your own github account and design your experiment inside the experiment folder.
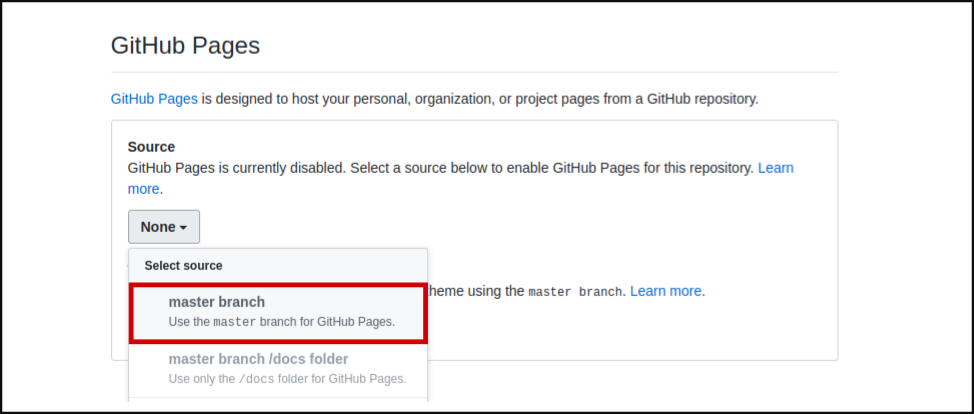
After forking jsPsychSheet repo. Go to your forked repo and deploy it as GitHub pages. To do that click on Settings.

Within settings navigate to GitHub Pages and select master branch as source. And thats all your repo is deployed as a github page.
Now design your experiment using jsPsych inside the jsPsychSheet/experiment folder. As an example we will use jsPsych’s tutorial Simple Reaction Time Task. No need to download jsPsych files, simply use the jsPsych files from jsPsychSheet/jspsych.
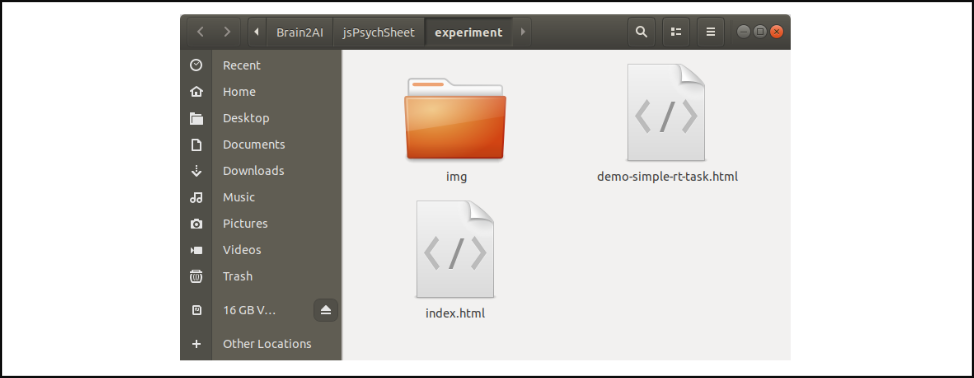
Check the original experiment file before modification.
Step 2: Modify your jsPsych experiment to use jsPsychSheet
To use the jsPsych experiment with Google Apps Script, we first change all the local image/file sources to use the source from your GitHub repo. Add the following line at the begning of each of your local sources: https://your-github-username.github.io/jsPsychSheet/experiment/. Replace your-github-username with your actual GitHub username, for eg: https://brain2ai.github.io/jsPsychSheet/experiment/. So, in our example experiment we will have to do following changes:
Before:
"<div style='float: left;'><img src='img/blue.png'></img>" +
"<p class='small'><strong>Press the F key</strong></p></div>" +
"<div class='float: right;'><img src='img/orange.png'></img>" +
"<p class='small'><strong>Press the J key</strong></p></div>" +
var test_stimuli = [
  { stimulus: "img/blue.png", data: { test_part: 'test', correct_response: 'f' } },
  { stimulus: "img/orange.png", data: { test_part: 'test', correct_response: 'j' } }
];
After:
"<div style='float: left;'><img src='https://brain2ai.github.io/jsPsychSheet/experiment/img/blue.png'></img>" +
"<p class='small'><strong>Press the F key</strong></p></div>" +
"<div class='float: right;'><img src='https://brain2ai.github.io/jsPsychSheet/experiment/img/orange.png'></img>" +
"<p class='small'><strong>Press the J key</strong></p></div>" +
var test_stimuli = [
  { stimulus: "https://brain2ai.github.io/jsPsychSheet/experiment/img/blue.png", data: { test_part: 'test', correct_response: 'f' } },
  { stimulus: "https://brain2ai.github.io/jsPsychSheet/experiment/img/orange.png", data: { test_part: 'test', correct_response: 'j' } }
];
Next we replace jsPsych library with our online hosted jsPsych library and additionaly add our jsPsychSheet library. Add following lines to the <head> of the html file.
Before:
<script src="../jspsych/jspsych.js"></script>
<script src="../jspsych/plugins/jspsych-html-keyboard-response.js"></script>
<script src="../jspsych/plugins/jspsych-image-keyboard-response.js"></script>
<link rel="stylesheet" href="../jspsych/css/jspsych.css">
After:
<!-- jsPsych library -->
<base target="_top">
<!-- jsPsych library -->
<script src="https://brain2ai.in/jsPsychSheet/jspsych/jspsych.js"></script>
<script src="https://brain2ai.in/jsPsychSheet/jspsych/plugins/jspsych-html-keyboard-response.js"></script>
<script src="https://brain2ai.in/jsPsychSheet/jspsych/plugins/jspsych-image-keyboard-response.js"></script>
<link rel="stylesheet" href="https://brain2ai.in/jsPsychSheet/jspsych/css/jspsych.css">

<!-- jsPsychSheet library -->
<script src="https://brain2ai.in/jsPsychSheet/jspsychsheet.js"></script>
<link rel="stylesheet" href="https://brain2ai.in/jsPsychSheet/jspsychsheet.css">
Now, send your experiment data to jsPsychSheet by calling jsPsychSheet.uploadData(jsPsych.data.get().csv()) function on finish of your experiment. Do the below change:
jsPsych.init({
  timeline: timeline,
  show_progress_bar: true,
  on_finish: function() {
      jsPsychSheet.uploadData(jsPsych.data.get().csv());
  }
});
Check the modified experiment file. Push your changes to your jsPsychSheet forked repo on GitHub.
Step 3: Host your experiment on Google Apps Script
Goto your google drive and create a “Blank spreadsheet”. Now goto Tools and click on “Script editor”. A new tab will open with an editor.

You will see a Code.gs tab inside the editor. Replace its content with the following:
// App Script function to host the html page
function doGet() {
  return HtmlService.createHtmlOutputFromFile('index');
}

// App Script function to interact with google sheet
function addData(data) {
  var ss = SpreadsheetApp.getActiveSpreadsheet();
  var sheet = ss.insertSheet(0);
  var i;
  for(i=0; i< data.length; i++){
    sheet.appendRow(data[i]);
  }
}

// App Script function to interact with google sheet
function addDataMultiBlock(data, start=0) {
  var ss = SpreadsheetApp.getActiveSpreadsheet();

  if (start == 1){
    var sheet = ss.insertSheet(0);
  } else {
    var sheet = ss.getActiveSheet();
  }

  var i;
  for(i=0; i< data.length; i++){
    sheet.appendRow(data[i]);
  }
}
Now click on File >> New >> HTML file

A pop-up will be displayed asking the file name, write index.html and click “OK”

Replace the contents of index.html with the contents of your modified experiment. After that click on Publish >> Deploy as web app...

Select with whom you have to share your experiment with, select “Anyone, even anonymous” to share without email verification. And then click on Deploy
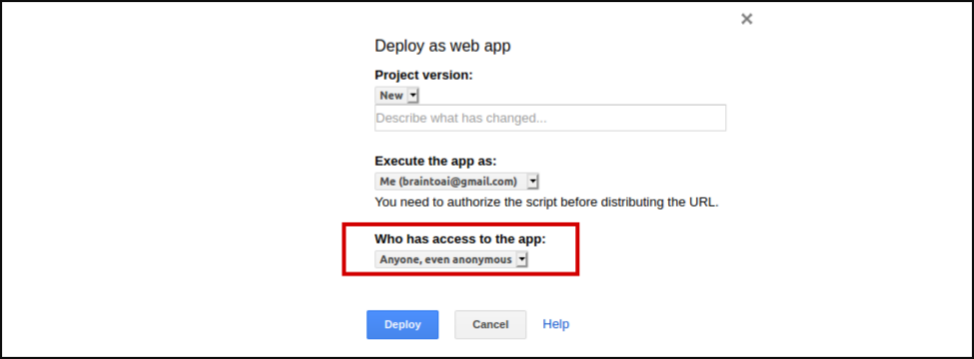
Grant the app permission to access google sheet data.

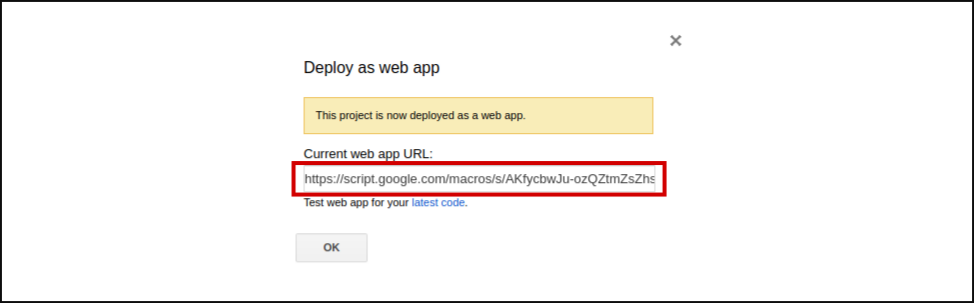
Congratulations! your experiment is now live… Copy the URL given and share it among your subjects for experiment.
Accessing your experiment data?
All the experiment data will be stored in the google spreadsheet which you created. For each of the subject, jsPsychSheet will create a separate sheet inside your spreadsheet.
